

Product photography is so important for all industries, and jewelry is no different. The top three things shoppers look for when purchasing jewelry are quality, design, and unique features. How can you best highlight those in your product photos? This is where photo editing comes into play.
Here are some tips on how to edit jewelry photos to maximize their sales potential on your online store, marketplace, website, or social media pages.
Why is editing important for jewelry photography?
Whether you shoot product photos in a professional studio or at home, editing your images is a crucial step before using your product shots online. Making jewelry images look realistic is crucial for shoppers to know what they’re investing in. Metal, gems, and stones can also be difficult to shoot because they have reflections, shine, and you need to show their intricate details.

Once you get to the photo editing stage, you can enhance your images by highlighting jewelry features and preventing imperfections from diminishing the impact of your product shots. You might also need to make edits or resize your jewelry photos to make them compatible with third-party marketplaces such as Amazon, social media, and other commerce channels.
Photo retouching can transform your photos into appealing, professional images that will impress your customers and lead to sales.
Correct the basics: exposure and white balance
The way we see a scene in front of us is different from what the camera sees and captures. That’s why the first step for improving any product photo is to adjust its exposure and white balance—it’ll show the true color of the jewelry so shoppers know what it looks like before they buy.
Exposure lets you change the brightness of your photo from underexposed (too dark) to balanced and over-exposed (too bright). You want to ensure the product is clearly visible when you adjust the exposure.
You’ll find the Exposure slider in Adobe Lightroom’s Basic panel.
Tip: Double-click on the slider pointer to reset it.

White balance adjusts two components: temperature and tint. Adjusting white balance refers to neutralizing any light cast during your shoot. Every light source has a different color temperature, measured in Kelvin (K). Depending on what light source you used during the shoot, the image may look cooler/bluer, neutral, or warmer/yellower.
The temperature slider helps you adjust the temperature for a neutral look. For creative purposes, you can go cooler or warmer, but for product shots, it’s best to aim for a neutral image.
The tint slider helps you make minor tweaks by adding magenta or green tint to fix any color balance issues from some light sources like fluorescent or neon lights.
In Lightroom, you can use the following:
- Pre-built White Balance presets: Select one of the White Balance profiles based on your shooting conditions. For example, if you shot using natural light, select Daylight, Cloudy, or Shade. Lightroom will automatically adjust temperature and tint.

- White Balance Selector: After selecting the tool (the pipette icon), click on a neutral-color part of your image (white, gray, or black areas). Lightroom will adjust both temperature and tint based on your selection to bring it as close to natural as possible. If you didn’t get it right the first time, repeat the process or adjust the sliders manually.

- Manual temperature and tint sliders: Change both sliders to match the product’s true colors.

Here’s an example of an unedited image with adjusted exposure and white balance in Lightroom, before any additional retouching:


Fix colors: hue and saturation
Customers want to see realistic photos of products. Just under half of returns happen because the product doesn’t match customer expectations based on the description, and this could include your photos.
Even after you’ve adjusted the exposure and white balance of your photo, you may still need to change or enhance product colors. Gold, for example, has many hues, so the color in the photo should be spot on.
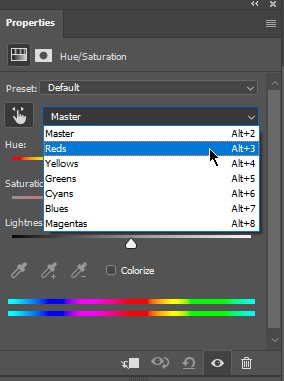
How to adjust hue and saturation
Here’s how to adjust hue/saturation in Photoshop:
You can change the hue and increase or decrease color saturation in Photoshop using the same layer. Create a new Hue/Saturation layer by selecting Layer > New Adjustment Layer > Hue/Saturation from the dropdown menu at the top.

To make local changes (ones that only apply to the parts of the photo containing that color), click on the color selector (finger icon) and click on the color you want to work on in the photo. In the example below, we would work with the yellows after clicking on the ring.

You can also select colors using the dropdown menu, like Reds or Yellows. Move the Hue and Saturation sliders to change the color.
In this example, we changed the hue of the ring from yellow gold to rose gold. A simple hue change but it can transform the photo.

Sharpen the details
You may not always get the jewelry perfectly sharp during the shoot but don’t worry—sharpening in Photoshop can help fix it. Sharpening the jewelry details will help it stand out in the photo, and elements like stones, gems, and engraving will be more prominent.
Tip: Don’t go overboard—and only apply local sharpening (not to the rest of the photo).
To sharpen the details in your jewelry product photos you can use these Photoshop tools:
- Unsharp Mask
- Smart Sharpen
- High Pass filter (our recommendation)

Add a shadow for 3D effect
If you’re shooting white background jewelry shots, you’ll want to add some sort of shadow in the shot. It will add dimension to your photos and make your product photos and store listings look professional. Getting the shadow right during the shoot can be difficult to master, but you can add it in post-processing.
There are different ways to use shadows in jewelry product shots:
- Drop shadow: Adds depth to the photo with a subtle drop shadow seemingly behind or next to the product. This is a great choice for jewelry shot on a flat surface, like rings, bracelets, and watches. The drop shadow follows the product’s shape, like in the examples below.

- Floating shadow: Gives the illusion of a product hovering above the ground. Earrings, necklaces, and pendants are a great choice for this effect because these products would naturally hang if worn by a model, and a shadow would appear.

- Reflection shadow: The reflective shadow is a popular choice for jewelry photos, but the other types may also apply. A reflective shadow gives the impression the product is on a glossy, mirror-like surface and adds a touch of luxury.

- Natural shadow: A natural shadow makes it look like your product has organically cast a shadow on its background or surface, even if there was no light source during the shoot. This would work well for most jewelry products placed on a flat surface.

- Enhanced existing shadow: If your product already casts a shadow during the shoot, you may want to keep it even if you remove or change the background. This is where an enhanced existing shadow comes in. It will retain the shadow and its shape but let you use the products with a different background.
 How to add a reflective shadow
Let’s look at how to edit jewelry photos by adding a reflective shadow in Photoshop (this effect will work best for jewelry shot head-on, not at an angle):
- Open your jewelry photo in Adobe Photoshop.
- Duplicate the image of the jewelry in a new layer by clicking Layer in the top menu and selecting Duplicate Layer or using the CTRL + J shortcut for Windows (Command + J for Mac).
- Flip the photo vertically by choosing Edit > Transform > Flip Vertically.
- Move the duplicated, flip layer to sit just under the original object, like a reflection. Reduce the opacity of the mirror layer to see its positioning better.

- Apply a very small Gaussian blur by selecting Filter > Blur > Gaussian Blur in the top menu.
- Draw a selection around reflection using the marquee tool. Make sure the top of the selection sits just below where the two images connect.
- Feather the edges of the selection and delete it.
- Apply a small natural shadow to the space where the object and its reflection connect.

Add lighting effects to make the jewelry shine
Add a spotlight effect to photos when you want jewelry to stand out from the scene. The spotlight effect slightly darkens the photo around the product, so all the attention goes to the jewelry—take a look at this step-by-step guide on how to do this yourself.
You can also create a lens flare effect to add sparkle to shiny jewelry and gems—but use it sparingly so the effect doesn’t overpower your photo.
How to add a lens flare
To add a lens flare:
- Open your jewelry photo in Photoshop.
- Duplicate the image in a new layer by clicking Layer in the top menu and selecting Duplicate Layer or using the CTRL + J shortcut for Windows (Command + J for Mac).
- In the top menu, select Filter > Render > Lens Flare.
- Select one of the four lens types (each creates a different effect) and adjust its brightness.

- Click OK and adjust the layer’s opacity if you want to reduce the effect further.

Reduce distracting or overbearing glares
On the contrary, you can also reduce distracting or overbearing glares. For example, if you’ve caught the reflection of your camera (or something else that shouldn’t be in the photo) on a shiny surface, like metal or glass. The same goes for a powerful flash that may have created a glare on jewelry.
You can do this using various photo retouching methods like:
- Clone Stamp tool, which takes pixels from one part of your image and you can paint them over the glare.
- Brush tool lets you paint over the glare with precision—you can adjust the Brush size, hardness, opacity, and color.
Retouch any scratches, smudges, or other imperfections
You can’t guarantee jewelry at the shoot will be spotless. You may come across the following:
- Smudges from fingerprints
- Scratches on the jewelry
- Unwanted reflections
- Dust or specks on the camera lens
One of the simplest and fastest ways to get rid of any of these imperfections is by using Photoshop’s Spot Healing Brush.

Click on the Spot Healing Brush tool in your Photoshop sidebar. Select the type of healing you want to apply—we recommend starting with Content-Aware.

Change the brush size depending on what you want to remove in the image by clicking [ or ] keys on your keyboard. If these keys don’t work for your device, head to Edit > Keyboard Shortcuts in your navbar at the top. Select Tools in the Shortcuts For dropdown and scroll to the bottom to find shortcuts for Increase / Decrease Brush Size.

When you use Spot Healing Brush, zoom in for a more precise result. Simply brush over any imperfections, and the software will remove the blemish or spot and replace it with pixels sampled around the area.
Using this method, we removed the photographer’s reflection in the necklace photo below.

If it doesn’t look right the first time, repeat the process, change the brush size (or zoom in more), or select Create Texture or Proximity Match as the brush type. Remember that depending on the imperfection, you may need to use the tool several times to fix the photo.
You can also use the Clone Stamp tool to take an existing part of your image and “paint” it over another image area:

- Select the Clone Stamp tool and hover over the area you want to take a part of the image from.
- Hold down the ALT key (OPTION on Mac) while you click over your selected section.
- Move your cursor over to the area you want to paint the cloned part and paint as you would with the Brush tool.
Change the background
There are a few instances where you might want to change the background of your jewelry photos:
- You’re selling on third-party marketplaces like Amazon, eBay, or Walmart and need white background shots to comply with the marketplace image requirements.
- You want an online store with a uniform look and give shoppers an easy, distraction-free product exploration.
- You want a transparent background for your jewelry shots to use for overlaying stock photos, graphics, or the brand’s website.
- You want different color backgrounds to fit a variety of marketing campaigns or to match the website’s color scheme.

You can also put jewelry on a colored or creative background, like on the ethical jewelry brand SOKO’s website. With the background removed, your jewelry photos become versatile visual assets you can use for different marketing channels.

To put jewelry on a white or colorful background (or add jewelry to stock photos in Photoshop), you have to cut it out first. Use clipping paths or image masking depending on object complexity.
Create a clipping path
Here’s how to create a clipping path:
- Set up your Pen tool in Photoshop.
- Draw a path around your product (zoom in to get a more precise path).
- Save and name your path.
- Create a clipping path.
- Create a selection from your clipping path.
- Create a clipping mask to isolate your product from its background.
Crop for the right context
Some jewelry shots require cropping to get tight on the product, fill the frame, and showcase small details.
Generally, you want the product in the center, filling most of the frame. This is a common method for ecommerce marketplaces and stores. For example, jewelry brand Kendra Scott crops and fills the frame regardless of the jewelry type or size. This makes for an easy browsing experience.

If you create a homepage banner, give plenty of blank space on one side so you can overlay text, a call to action (CTA), or leave it blank. Catbird jewelry store fills the space with promotional text and a CTA.

To show the craftsmanship of jewelry pieces, cropping in even tighter for closeup shots will draw attention to the small details and design. Mejuri uses a closeup photo of a ring to share the brand’s commitment to sustainability and quality.

For some model shots, consider cropping out models’ facial features to direct focus to the jewelry, like Mejuri on its homepage. A customer's gaze will naturally be drawn to the jewelry piece.

Add filters for social media
Filters can add a unique, cohesive look to your social media feed, especially when they’re on-brand. While they’re generally not ideal for your website (you want to reserve that space for the highest-quality shots), social media is where you can be more adventurous with visuals to see what appeals to your target audience.
Some ideas you can use:
- Color filters (like a yellow filter to add warmth to the photo)
- Black and white layer (for a timeless look)
- Overlay with black and reduce the layer’s opacity for a muted look (works well for adding text copy over the photo)

You’ll find these filters and presets in Adobe Lightroom or Photoshop, or use photo editing or social media apps with editing features like Instagram.
Keep the edited photos aligned with your brand aesthetic to maintain consistency. A great example of this is the handmade jewelry brand Mountainside Made. All of the brand’s jewelry photos have a warm tone, muted shadows, and plenty of grain on the photo for an organic feel.

Change color for new variants
You may get a new color variant for your jewelry stock, or you may want to change the color of another element in your photo, like the background or props. You don’t have to worry about re-doing the photoshoot because you can easily change the color in Photoshop.
In the first example, we changed the color of the background flowers to blue, matching the gems on the ring.

But you can also change the color of the jewelry. Here, we made color changes only to the gems from blue to red, without altering the flowers in the background.
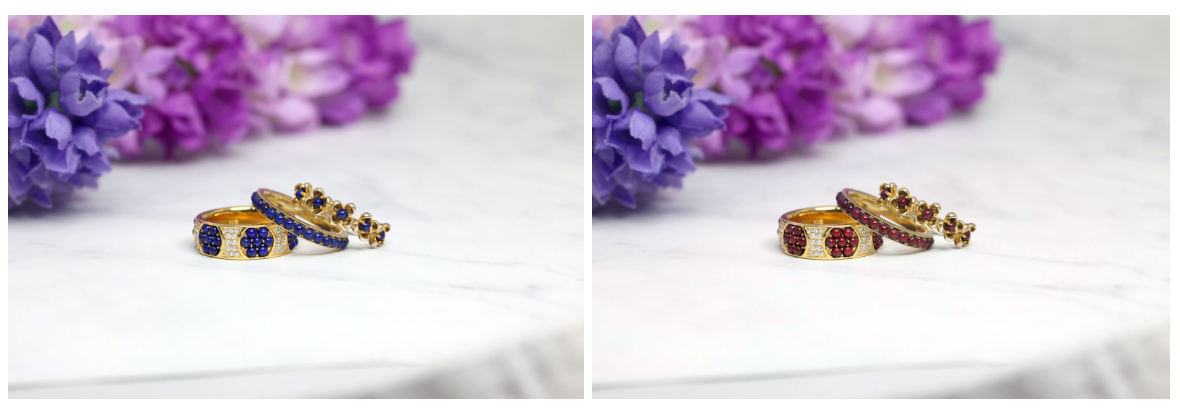
How to change color
There are several ways to change the color of a product variant in Photoshop. A simple one includes adjusting the hue of a particular color in your photo:
- Open your file in Photoshop.
- In the top menu, click on Layer > New Adjustment Layer > Hue/Saturation.
- Select the color you want to change by using the pointer icon and clicking on the color in your photo or choose one from the dropdown menu, like Blues.
- Move the Hue slider to create your new color. Use the Saturation slider to fine-tune its vibrancy.
- To remove this effect on other parts of your photo, click on the layer’s mask and select the Brush tool. Make sure its opacity is at 100% and paint over sections that don’t need the color change.
For more complex items like multi-colored jewelry, repeat the steps above several times or use more advanced retouching methods.
Give your jewelry a pixel-perfect finish
Photo editing is an essential step before presenting your product photos online because shoppers will use them to decide which jewelry pieces to invest in. A few editing steps can go a long way to take your photos from good to great. If you prefer to leave it to professional editors, our team can assist you.

Let our pro designers look after your most tedious image edits, from 25¢ per image
Learn moreHow to edit jewelry product photos FAQs
How do you edit jewelry photos?
Start with a clean-up to remove any blemishes. Adjust image exposure and colors for a natural look. Add any extras like shadows and reflections, and export your photo for the platform you will use.
What is the best photo editing app for jewelry?
- Snapseed
- Photoshop Express
- Lightroom CC Mobile
- Afterlight 2
How do you make jewelry stand out in pictures?
- Adjust colors, white balance, and brightness
- Sharpen the small details
- Remove blemishes like fingerprints or scratches
- Crop for maximum impact
Is there an app for taking pictures of jewelry?
You can use your smartphone’s default camera app and turn on the macro setting. Alternatively, try camera apps with manual controls like Camera Zoom FX, Halide Mark II, ProCamera, and Camera+ Legacy.
What is jewelry photo retouching?
Jewelry photo retouching means enhancing a photo with professional editing tools. You can remove any specks or dust, correct the color to appear natural, and enhance the shine and sharpness of metal and gems.

