

There are a number of reasons why you would want to know how to blur a photo’s background in Photoshop. For starters, a product photo with a background that is blurry helps the product stand out. Also, photos with blurred backgrounds (or photos taken with a shallow depth of field) look more professional, because, up until recently, the effect could only be achieved with fancy lenses and a skilled photographer.
Receive free ecommerce & product photography tips
It might be easy to get the perfect blur for your product shot backgrounds with your camera, but when you can’t reshoot, you can do it in Photoshop. Below, we’ll show you how to blur the background in Photoshop to allow your focal point to shine.
How to create a background blur in Photoshop
- Set up your layers
- Work with the subject layer
- Work with the Background layer
- Apply the blur
- Get your final image
Step 1: Set up your layers
To get a seamless, blurred background effect, we’ll be converting our photo into two layers: one layer for the subject and one layer for the background. In this tutorial, we assume you’re working with a flattened, 1-layer image like a JPG.
Open your product photo in Photoshop and navigate to the Layers panel (if you don’t see the Layers panel, you can access it by choosing Windows > Layers from the dropdown menu at the top of the application window).

Duplicate the Background layer and name the layer “Subject.” You should now have a Subject layer sitting on top of the Background layer.

Step 2: Work with the subject layer
While in your subject layer, choose the Magic Wand Tool from the Toolbar and click the Select Subject button from the top of the screen.

Once you’ve selected the product or model, go back into the Layers panel and click on the Add Layer Mask icon at the bottom of the panel.

Finally, disable visibility for the Background layer by clicking on the Eye icon next to the Background layer.

The Select Subject tool is pretty good, but you might want a sharper and more precise edge on some areas of your subject.
Click on the Image Mask within the Subject Layer.

Choose the Brush Tool from the Toolbar and use it to add or subtract areas of the image to the subject. To “paint” back in parts of the subject that need to be visible, set the Foreground color to white. To “erase” areas of the subject, set the Foreground color to black. You can adjust the width and hardness of the brush as necessary using the options at the top of the Application window.

Step 3: Work with the Background layer
Once you’re happy with how your subject looks by itself, while staying in the Subject layer, choose Select > Load Selection… from the dropdown menu at the top of the application window.

Choose Subject Mask from the pop up window and click OK.

While your Subject is selected, turn off Visibility for your Subject layer, and click on the Background layer. Click the Eye icon next to the Background layer to turn visibility on.

We’re going to extend the edges of the selection out just a little bit to make sure we don’t pick up any pixels from our subject in our selection. Choose Select > Modify > Expand from the dropdown menu at the top of the application window.

A pop-up menu will appear asking how much you want to expand the selection. The proper amount will depend on the size of your image; in this example, we’re setting the selection to 20 pixels. Do not check the box for “Apply effect at canvas bounds.”

Once your subject is selected in your Background layer, hit the BACKSPACE key (DELETE on a Mac) on your keyboard.
If your Background layer is still locked, a popup menu will appear asking you what you want to fill the empty space with. Choose Content Aware next to Contents.

If your Background layer is not locked, choose Edit > Fill from the dropdown menu at the top of the screen instead of deleting the selection. Then, choose Content Aware. You can now de-select the selection.

Step 4: Apply the blur
To achieve the most realistic background blur in Photoshop, we can’t just apply a uniform blur to your entire background. Instead, we’re going to work with a tool called Field Blur.
To access the Field Blur window, choose Filter > Blur Gallery > Field Blur from the dropdown menu at the top of the application window.

Using the Field Blur tool, you are able to control the blur in different areas of the photo by placing pins on those areas and then adjusting the blur to the right.
By default, there’s a pin at the middle of the image.
In this particular image, we want the very background to be blurrier (where we can see the buildings in the distance), we want areas closest to the camera to be slightly blurred, and we want the areas of the image right next to the model to be crisp.
So, in the example image, we place the pins accordingly:

Then, on the right-hand side, we can adjust the blur of those areas using the slider labeled “Blur.”
To adjust the blur, select a placed pin by clicking on it with the mouse. Then, slide the Blur slider to the right to increase the blur, and to the left to reduce the blur. Repeat with all the pins.
Once you’re satisfied with the blurred image, click OK at the top of the screen.
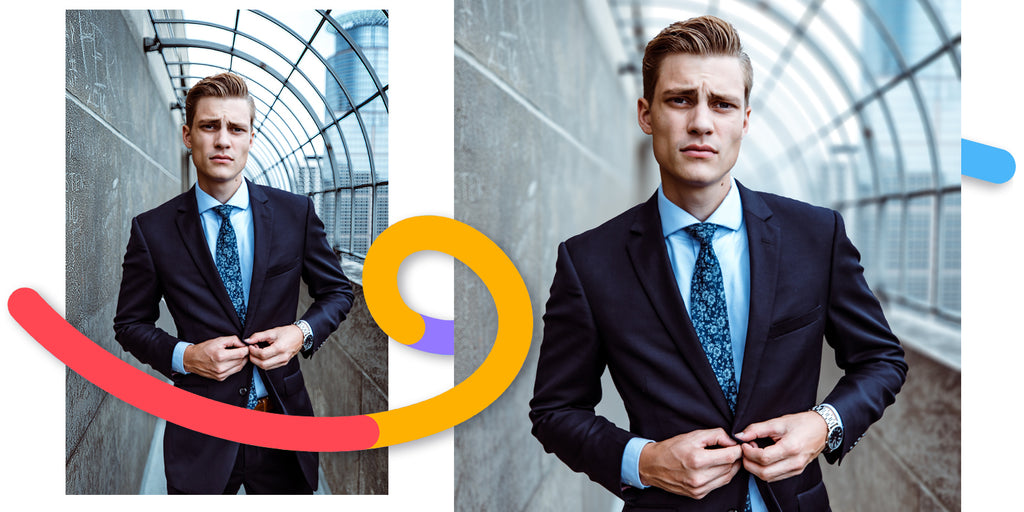
Step 5: Final image
Turn on the visibility of your Subject layer to see the final image. If you’ve done everything correctly, it should look pretty slick.

Master more Photoshop techniques
You can do lots of things in Photoshop to make your product photography stand out and convert more shoppers. Learn more skills with these Photoshop tutorials.
Sometimes, photo edits can be tedious and time-consuming — distracting you from more important parts of the business. If that’s the case, you can outsource all your editing needs to your very own virtual design studio.


![How to Create a Clipping Path in Photoshop [Updated for 2022]](http://pathedits.com/cdn/shop/articles/image14.jpg?v=1639448433 "How to Create a Clipping Path in Photoshop [Updated for 2022]")


